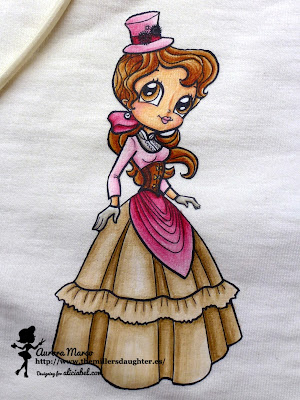
Hi there!
Today is the 5th Friday of the month and to celebrate we have an especial post for you!
But first let me remind you that we have a challenge going on
with lots of chances to win some of Aliciabel gorgeous images.
And now, I, Aurora, have prepared you this tutorial on how to transfer digital stamps
onto fabric for then colouring with Copic markers.
It's a very effective technique. It's easy, looks nice and I love it!
Hope you like it and try it yourself.
This is the picture of my finished project using Steampunk Girl by Alicabel.
You will need a top (t-shirt, bag or whatever fabric you want to use),
a sheet of transfer paper for dark clothes, your printer, your iron,
a piece of backing paper and your Copic markers.
First I printed the image at the desired size on the transfer paper.
Then I fussy cut the image.
Then I removed the backing paper (very important!)...
...and placed the image centred on the top.
The next step was to heat transfer the image onto the fabric with my iron.
The image needs to be covered with backing paper.
I recommend you to carefully read the instructions of your specific transfer paper.
For mine, it was recommended to use the cotton settings with no steam and apply heat for about 30 seconds, but with continuous movement of the iron to not burn the spot =P
Now, my image is transferred and it's time to start colouring.
Colouring on the fabric is not like colouring on paper.
I guess I could say that the lighter colours wash the darker ones.
However, blending is quite good and it does not take to long to get used to the differences.
Maybe a good trick would be to apply always a coat of the lighter shade
before adding the darker ones.
Once the image is completely coloured you need to repeat the ironing process
to make sure the colour gets fixed onto the transfer paper.
Hope you like it and try it yourself.
And if you do, don't forget to share it on our challenge.
Have a nice weekend =D


Gracias por el tutorial. Ya sólo queda ponerlo en práctica!
ReplyDeleteGracias por el tutorial. Ya sólo queda ponerlo en práctica!
ReplyDeleteMuy interesante y muy útil. Muchas gracias, Aurora.
ReplyDeleteIt looks amazing and a great and easy tutorial to follow, well done - I am just wondering about when you have to wash it, do you need to do anything special??
ReplyDeleteHi Cathie,
DeleteI already made some last year for me and for my kids. I normally wash them in a short cycle and let them dry in the air instead of using the drier. Hoverer, my little one is quite messy and hers sometimes need stain removers and hot water. And also sometimes by accident they have ended up in the drier. And even so, they still look well.
I have to say that this depends more than anything in the quality of the paper transfer that you are using.
Cheers,
Aurora
Me encanta cómo te ha quedado, a ver si me atrevo a probarlo algún día. Gracias por el tutorial!
ReplyDeleteMuchas gracias por el tutorial, a ver si lo pongo en práctica, donde se puede comprar el papel?
ReplyDeleteMuchas gracias por el tutorial, a ver si lo pongo en práctica, donde se puede comprar el papel?
ReplyDeleteGracias Ana, me alegra que te guste. Se puede comprar en cualquier papelería.
DeleteUn saludo